Vehicle lighting failures rarely begin with a dramatic break. More often, a faint haze forms inside a lens, a connector loosens after repeated vibration, or a seal hardens through hot-and-cold cycles. In 2026, durable lighting depends on treating the lamp as a complete system—not just a bright LED or a tough housing. Lenses, coatings, wiring, thermal paths, vents, and mounting points all influence service life. One weak interface can undo an otherwise careful design.
Understanding how to improve durability in vehicle lighting systems starts with the conditions each vehicle actually faces. A delivery van idling for hours encounters different heat patterns from a car parked outdoors in strong sunlight. Engineers and fleet teams can use controlled vibration, temperature cycling, moisture exposure, and UV testing to reveal likely weak points. They should also inspect real-world returns and maintenance records, since laboratory results do not capture every road, wash, or installation practice. That gap matters.
Practical improvements include selecting compatible lens and seal materials, protecting connectors from water and corrosion, and managing heat around LEDs and drivers. Assembly checks can catch uneven gasket compression or a pinched wire before the vehicle leaves the factory. After installation, regular checks for condensation, flicker, cracked lenses, and loose mounts provide useful early warnings. No single material or test guarantees long life. Trade-offs remain, and a stronger seal may complicate pressure equalization. The honest approach is to test the whole assembly, document failures, and revise designs when evidence points to a better solution.
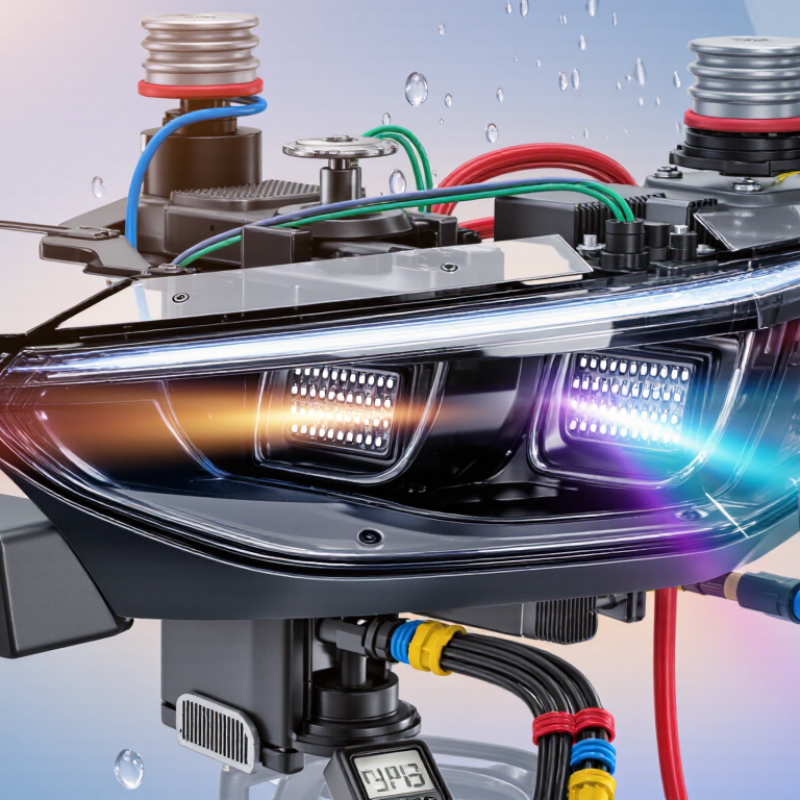
How to Improve Vehicle Lighting Durability in 2026
Understanding the Factors That Affect Vehicle Lighting Durability
Vehicle lights face more than ordinary wear. Road vibration can loosen mounts and stress solder joints, while water may enter through aging seals. Heat is another quiet culprit: repeated hot-and-cold cycles can damage lenses, wiring, and electronic drivers. Dust, road salt, and ultraviolet exposure gradually cloud plastic lenses. Small cracks matter. They can let moisture reach electrical contacts.
The U.S. Department of Energy’s 2020 report, LED Basics, notes that quality LED products can last 25,000 hours or more under suitable conditions. That figure describes general LED products, not complete automotive lamp assemblies; real vehicle life also depends on heat management, sealing, and vibration. I would not treat a long rated life as a guarantee. Even a sturdy light can fail early if a loose housing rattles on rough roads.
Tips: Inspect lenses and seals during routine maintenance. Look for fogging, yellowing, cracked edges, or loose mounts. Keep lamp vents clear, and replace damaged seals promptly. Avoid high-pressure washing directly at seams. Ask suppliers for environmental test evidence, such as vibration, moisture, and temperature-cycle testing described in SAE J575, the Society of Automotive Engineers’ lighting-device test standard. That paperwork helps, though it cannot predict every vehicle’s service life.
Understanding ingress protection: Dust and water resistance can help protect vehicle lighting from contaminants and moisture. The first IP digit indicates solid-particle protection; the second indicates water protection. IPX8 test conditions are specified by the manufacturer, while IPX9K covers high-pressure, high-temperature water jets. These rating numbers are classifications, not a linear measure of durability, and do not represent the full service life of a lamp.
In 2026, vehicle lighting durability still depends on small checks made before a fault becomes obvious. Inspect each lens in daylight for hairline cracks, cloudy patches, and moisture beads behind the cover. A little condensation may clear after use, but standing water or repeated fogging deserves attention. Don’t assume a lamp is sound just because it still turns on.
Follow the wiring from the lamp connector, looking for rubbed insulation, stiff sections, loose clips, or greenish corrosion at terminals. Gently move the harness while the lights are on; flickering can reveal an intermittent connection. Keep hands clear of hot components, and disconnect power before handling exposed electrical connections. A quick visual check can miss a fault inside a connector, so persistent failures call for proper testing.
Check rubber seals for flattening, tears, or dirt trapped along the edge. Make sure mounting points are snug and free of rust, cracked plastic, or signs that the lamp has shifted. After driving on rough roads, a beam that suddenly points lower may signal a loose bracket. I have seen a clean-looking assembly fail because one small clip was brittle. It’s easy to overlook. Record recurring defects and repair them with suitable parts; tightening a damaged mount may only hide the problem.
| Inspection Area | Recommended Check | Typical Wear Indicators | Objective Measurement or Acceptance Guide | Durability Risk | Recommended Corrective Action | Suggested Review Frequency |
|---|---|---|---|---|---|---|
| Lamp Lens and Housing | Inspect the lens, housing, vents, and optical surface under daylight and with the lamp switched on. | Cracks, deep scratches, yellowing, clouding, heat discoloration, loose housing, or visible internal moisture. | Replace any housing with a structural crack, open seam, or water path. Minor surface haze should not obscure the beam pattern or reduce required light output. | High | Replace damaged assemblies. Clean only with materials approved for polycarbonate lenses; avoid abrasive cleaners and solvents that can cause stress cracking. | At every scheduled service and after impact, collision, or pressure washing. |
| Light Output and Beam Pattern | Verify low beam, high beam, daytime running lamps, turn signals, brake lamps, rear fog lamps, and reversing lamps where fitted. | Flicker, intermittent operation, uneven brightness, dark zones, poor aim, or a beam pattern that changes when the connector or housing is moved. | Use the vehicle service specification or applicable road-safety requirement. Left and right lamps should provide consistent operation and a stable beam pattern. | High | Correct aiming, replace failed light sources, and diagnose the circuit before fitting a new lamp if the failure is intermittent. | Monthly functional check and before long-distance travel. |
| Electrical Connectors | Check connector locks, terminals, seals, and signs of heat or chemical contamination. | Green or white corrosion, darkened terminals, melted plastic, loose pins, broken locks, water marks, or fretting wear. | Terminals should be tight, clean, and fully seated. A connector should not disconnect when lightly tugged by hand; excessive terminal resistance requires repair or replacement. | High | De-energize the circuit, repair damaged terminals with the correct service parts, renew missing seals, and apply only specified terminal protection. | Every 12 months, or more often in high-humidity, salted, or dusty environments. |
| Power and Ground Wiring | Inspect harness routing, abrasion points, ground attachments, splices, and areas exposed to heat, water, or vibration. | Chafed insulation, exposed copper, hardened insulation, stretched wires, loose grounds, poor repairs, or wiring touching sharp edges. | With the lamp operating, measure voltage at the lamp and compare it with battery or charging-system voltage. A large voltage drop indicates resistance in the power or ground path; follow the vehicle service limit where available. | High | Reroute and secure the harness, protect contact points with suitable abrasion protection, clean ground surfaces, and replace unsafe splices rather than wrapping them with tape alone. | At every scheduled service and after underbody or front-end repairs. |
| Gaskets, O-Rings, and Seals | Inspect the perimeter seal, bulb or module seal, pressure vents, and access covers. | Flattening, cuts, hardening, swelling, missing sections, poor seating, or evidence of water and dust entry. | Seals should be continuous, flexible, clean, and correctly positioned. Any repeated condensation or visible droplets indicates a sealing or ventilation fault. | High | Replace damaged seals, clean mating surfaces, verify cover engagement, and do not block designed pressure-equalization vents. | At every lamp removal and at least once per year. |
| Condensation and Moisture | Observe the lamp after temperature changes, rain, washing, or overnight parking. | Persistent fogging, water droplets, pooling water, corrosion, or moisture that does not clear after normal lamp operation. | Light temporary misting may occur after rapid temperature change, but standing water or recurring heavy condensation requires diagnosis. | High | Inspect seals, vents, housing joints, and mounting damage. Dry and repair the assembly only when permitted by the service procedure; replace units with internal corrosion or structural leakage. | After severe weather, washing, or any lamp replacement. |
| Mounting Brackets and Fasteners | Check brackets, tabs, screws, clips, adjusters, and mounting points for movement or damage. | Loose fasteners, cracked tabs, missing clips, stripped threads, vibration marks, or a lamp that moves when pressed lightly. | There should be no perceptible movement at the housing. Tighten fasteners to the vehicle service specification; do not overtighten plastic housings. | Medium | Replace cracked brackets and missing hardware, restore correct fastener torque, and confirm that the lamp remains aligned after a road test. | Every 12 months and after collision, suspension work, or heavy vibration exposure. |
| Vibration and Harness Strain | Inspect cable slack, clips, strain reliefs, and contact between the lamp and adjacent body panels. | Rubbing marks, repeated bulb or LED failure, rattling, fractured solder joints, or a harness pulled tightly at the connector. | Harnesses should have controlled slack and should not carry the weight of the lamp or connector. No wire should be pinched between body panels. | Medium | Restore clips and strain reliefs, add approved protective sleeving where required, and eliminate contact with sharp or hot surfaces. | Every 12 months and whenever abnormal vibration or noise is reported. |
| Thermal Stress and Heat Management | Check heat shields, ventilation paths, lamp electronics, and nearby components for overheating. | Discolored connectors, brittle insulation, warped plastic, repeated shutdown, thermal warnings, or premature light-source failure. | Compare measured temperature and operating behavior with the vehicle service specification. Keep cooling paths and designed vents unobstructed. | Medium | Remove obstructions, repair heat-damaged wiring, verify correct light-source wattage or module type, and investigate repeated thermal shutdowns. | Every 24 months or whenever repeated failures occur. |
| Cleaning and Chemical Exposure | Review cleaning methods and inspect surfaces after exposure to road salt, fuel, oil, de-icing chemicals, and detergents. | Surface crazing, coating loss, sticky residue, discoloration, corrosion, or degraded rubber components. | Use clean water and a soft, non-abrasive cloth. Avoid unapproved solvents, strong alkaline cleaners, and high-pressure spray directed at seals or connectors. | Medium | Rinse contaminants promptly, replace chemically damaged seals or connectors, and follow the lamp manufacturer’s approved cleaning procedure. | After winter driving, off-road use, or chemical exposure. |
| Electrical Load and Charging System | Check battery condition, charging voltage, fuses, control modules, and circuit compatibility when lamps fail repeatedly. | Repeated fuse failure, over-bright or dim lamps, warning messages, flickering, or multiple lighting faults at once. | Charging voltage and circuit load must remain within the vehicle’s specified operating range. Never replace a fuse with a higher-rated fuse. | High | Diagnose the root cause with a wiring diagram and suitable test equipment. Correct overloads, poor grounds, or incompatible replacement components before returning the vehicle to service. | Whenever a fuse opens, a warning appears, or more than one lamp fails. |
| Post-Repair Verification | After repair, test all lighting functions, inspect for leaks, confirm alignment, and perform a short road test where safe. | Corrected lamp still flickers, beam aim changes, warning remains active, or the housing moves after repair. | All applicable functions should operate consistently, with no exposed wiring, unsecured components, or persistent moisture. | Low | Record the repair, part type, test result, and date. Reinspect if the same fault returns, because repeat failures often indicate an unresolved wiring, sealing, or mounting problem. | After every lighting repair or component replacement. |
How to Improve Vehicle Lighting Durability in 2026
Durable vehicle lighting begins with material selection, not styling. Polycarbonate lenses resist impact, but they need UV-stable coatings to reduce yellowing and surface cracking. SAE J576 evaluates plastic materials for lighting applications, including heat, humidity, and ultraviolet exposure. Engineers should use its test logic early, before tooling begins.
Sealing details matter just as much. ISO 20653 defines protection levels for road vehicles, including IP6K9K exposure to high-pressure, high-temperature water jets. A small vent can prevent condensation, yet it must block dust and liquid intrusion. Gore design is not always better; poorly placed membranes can trap moisture.
Weather loads are becoming less predictable. NOAA recorded 28 billion-dollar weather and climate disasters in the United States during 2023. That figure does not measure lamp failures, but it signals harsher operating conditions. Thermal cycling deserves equal attention. WMO reported 2023 as the warmest year recorded, at about 1.45°C above the pre-industrial average. Repeated heat can weaken seals, warp housings, and accelerate LED junction aging.
In field testing, inspect lamps after pressure washing, road salt exposure, and overnight freezing. Look for water lines inside the lens. They reveal design weaknesses. One imperfect assumption remains common: passing a laboratory test does not guarantee ten years on the road. Retesting with real dust, vibration, and repair practices can expose failures earlier.
Vehicle lighting durability begins with careful installation, not stronger bulbs. A light can fail when its housing vibrates against a rough mounting surface. During workshop inspections, I have seen tiny alignment errors create stress around mounting tabs. Small gaps matter. Clean the surface, check the gasket, and remove grit before tightening. Use the vehicle’s service specifications for torque and aiming. A loose lamp shakes on uneven roads, while excessive force can crack its housing.
Protect the wiring as carefully as the lamp itself. Route harnesses away from sharp edges, hot components, and moving suspension parts. Leave a gentle service loop. Secure cables with suitable clips, but do not crush the insulation. Seal connectors firmly and use approved electrical protection where specified. Water often enters through a connector that looked secure during installation. That detail is easy to miss.
Road debris can damage exposed lenses, especially on lower-mounted lights. A clear protective shield may help, provided it does not trap heat or scatter the beam. Keep drainage paths open around the housing. After washing or driving through heavy rain, inspect for fogging, loose fasteners, or flickering. I once dismissed light condensation as harmless. The moisture later reached the connector. That mistake changed my inspection routine. Record the date, mounting condition, and any repair, because repeated failures may reveal vibration or routing problems rather than a defective lamp.
Reliable vehicle lighting depends on routine checks, clean lenses, and careful attention to heat and moisture. Park on level ground and test low beams, high beams, turn signals, brake lights, and reverse lights. Ask someone to watch the rear lamps while you press the brake. Look for condensation, cracked seals, loose connectors, or a beam that appears dimmer than its partner. Small changes matter.
The U.S. Department of Energy estimates that residential LED lamps can last about 25,000 hours, compared with roughly 1,000 hours for incandescent lamps. Those figures are not automotive-life predictions: vibration, sealed housings, temperature swings, and electrical faults change the conditions. Still, the comparison shows why component type alone cannot guarantee long service.
Inspect after heavy rain or rough-road driving, and follow the vehicle maker’s service guidance. Clean lenses with a soft cloth and mild soap; abrasive pads can cloud the plastic. When replacing a lamp, avoid touching halogen glass with bare fingers, and confirm the beam pattern afterward. A quick wall check can reveal a crooked cutoff. I have seen people skip that step. It is easy to miss. Keep a dated note of inspections and replacements; the record may expose a recurring moisture or wiring problem before another lamp fails.
Check the lens in daylight for hairline cracks, cloudy patches, and moisture beads. A little fog may disappear after use. Standing water or repeated fogging needs attention. Do not assume the lamp is healthy because it still turns on.
Follow the wiring from the connector and inspect rubbed insulation, stiff sections, loose clips, or green corrosion. Gently move the harness while the lights operate. Flickering may reveal an intermittent connection. Keep hands away from hot parts. Disconnect power before handling exposed connections.
Look for flattened rubber, tears, dirt, or gaps around the seal edge. A poorly seated seal can allow moisture into the housing. Clean surfaces help, but damaged rubber needs suitable replacement. Not always obvious.
Check mounting points for loose fasteners, rust, cracked plastic, or movement. After rough-road driving, a beam pointing lower may indicate a loose bracket. Tightening a damaged mount can hide the real problem. I have overlooked one brittle clip before.
Impact-resistant plastic lenses can help, especially with stable ultraviolet protection. Material testing should include heat, humidity, ultraviolet exposure, and vibration. A strong lens alone cannot prevent seal or wiring failures.
Inspect lamps after pressure washing, road salt exposure, heavy rain, and overnight freezing. Look for water lines inside the lens. They can reveal weak sealing or drainage design. A small vent may reduce condensation, but it must resist dust and liquid entry.
Park on level ground and test low beams, high beams, turn signals, brake lights, and reverse lights. Ask another person to watch the rear lamps during braking. Compare brightness between matching lamps. Small changes matter.
Use a soft cloth with mild soap. Abrasive pads can cloud the plastic surface. Avoid touching halogen glass with bare fingers. After replacement, confirm the beam pattern against a wall. Test it again.
Published lamp-life figures often come from controlled conditions, not vibrating vehicles. Temperature swings, moisture, sealed housings, and electrical faults can shorten service life. The comparison helps, but it is not a promise.
Record inspection dates, moisture findings, wiring defects, repairs, and replacements. Recurring notes may expose the same seal or connector problem before another failure. I may overcheck, but the record is useful.
Improving vehicle lighting durability in 2026 requires a complete approach that considers environmental exposure, vibration, heat, moisture, electrical load, and installation quality. To understand how to improve durability in vehicle lighting systems, inspect lamps for fading, cracks, clouding, or reduced brightness, while checking wiring for corrosion, loose connections, and damaged insulation. Seals should remain flexible and secure, and mounting points must be tight enough to prevent excessive movement or vibration.
Durable materials, weather-resistant housings, reliable connectors, and effective heat management can significantly extend service life. Proper installation also helps prevent water intrusion, impact damage, and wiring strain. Regular cleaning, alignment checks, electrical testing, and early replacement of worn components support long-term reliability. By combining careful material selection, secure mounting, protective maintenance, and routine performance testing, vehicle lighting systems can remain safer, brighter, and more dependable throughout demanding operating conditions.

EV Light